Showing posts with label DIY projects. Show all posts

Sunday, March 01, 2015

Activity: Free Dr. Seuss Day Crafts and Printables!

March 2nd is Dr. Seuss' Birthday and an unofficial holiday of all things Seuss, Cat in the Hat and rhyming 'til your heart's content. What fun! Here are some ideas on how to make a day of 'Suess' after all the books are read and the kids get restless :) Find more ideas on my Pinterest board too!


Truffela Tree Craft from See Vanessa Craft

 3 Fun Preschool Crafts Inspired by the Dr. Seuss Book The Lorax - Click through to see more Seuss ideas!
 Lorax Puppet from Laly Mom


Handprint Fish from Vanessa Dewey

Tuesday, February 24, 2015

Printables: Free Laundry Labels


I realized that I only made a half batch of my all natural laundry detergent back in December, so I was due for some quality sitcom time - just me, my soap grater, and Betty White, lol! To tell the truth, the more I sat there with my canister, the more frustrated I became. I am so happy that I found a solution for hypo-allergenic soap, but my canister didn't exactly match. It was blah and looked temporary. I love to recycle, but I also love it when my re-purposed item looks like it belongs.

I mean, this doesn't exactly scream clean clothes:


Anyone else feel this way? So I spent a bit of time playing with my graphics editor and I thought I'd share. These PDFs include directions and my laundry recipe plus a cute quote. I hope you like them and can use'em too!


Download JG Laundry Printable:
(works with a 34.5 oz Folger's canister)


Laundry Label in Blue

Laundry Label with Banner

Tuesday, February 17, 2015

Activity: Fun Things to Do for Chinese New Year

Chinese New Year is this Thursday, February 19th. If you have little ones at home, you know having themed activities for the kids is a great way to keep their attention and little hands occupied while encouraging them to learn about other cultures. I put together a list of ten fun DIY projects that you can do at home with your children. There's something for everyone, from simple crafts to coloring pages!

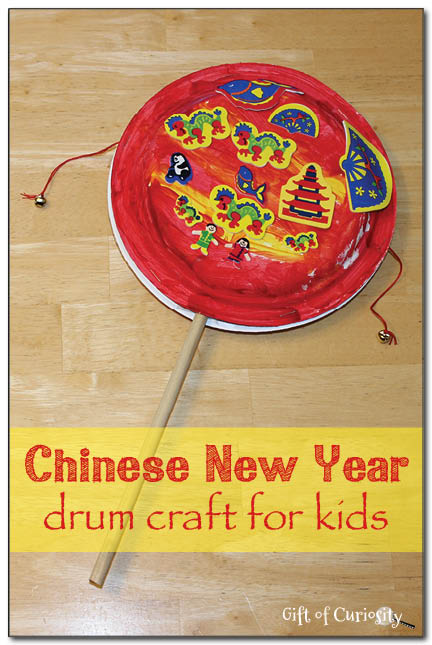
Hand Drum from Gift of Curiosity

Red Envelopes from Sun Scholar

Simple paper lantern from Planet Forward

Chinese New Year Snake craft from Craftiments

Year of the Goat Coloring Pages from Activity Village

Chinese Dragon Paper Plate Puppet from DLTK Holidays

Ming Vases by Arteascuola.com

Asian Fan Folding from First Palette

Chinese Coin Tree from First Palette
Easy Fortune Cookies from I Save A 2 Z

Sunday, February 01, 2015

DIY: Eight Uniqe Valentine's Day Crafts

Valentine's day is fast approaching and I wanted to share some fun and simple craft ideas the whole family can enjoy. Here's a quick round-up of unique paper crafts you can do on a budget. Many just require household items you have on hand and can easily be paired with candy or a hand written note. It's something sweet that special someone will appreciate :)

Valentine's Day Kisses by Craftaholics Anonymous

Heart Bookmark by How About Orange

Collapsible Heart Card by Say Not Sweet Anne

Sunday, January 11, 2015

Diy: Travel Mug Hack


I love walking thru Target; I always seem to get crafty and creative after perusing all the art, decor and gift items. Like this one: Target introduced a fun theme section with Marvel products just before Christmas (great marketing, T! lol). I have to say, a lot of the items seemed really cool... the prices, well, Target prices, haha.

Who wants to pay $5.99 for a plastic travel mug?? I loved the inspiration. (My hubby could use one for work!) But I think the price was pushing me more to DIY than anything, lol. I knew I could hack that...

This was so simple and I was able to use scraps and a travel mug I had on hand. If you don't have one already, they sell these mugs at (you guess it!) the 99 cent Only store. Just make sure it has a screw on insert :)

Here's the DIY, but it's so simple, it's almost self explanatory.....

1. Grab a mug with a screw-on top. It will probably say "double walled" mug on the label. This should come apart easily enough - I tested mine in the store. If yours doesn't it may be glued and won't work for this project. Carefully pull apart the pieces and keep the paper insert. You'll want to use it as your template.


2. Smooth and flatten out your paper insert so you can use it to trace a template. The edge of a table or book is good for this.

3. Choose a paper you want to wrap your mug with. I had some scraps of wrapping paper, but any paper will do. Old posters, scrapbook paper, magazine inserts, birthday cards, etc. - anything you like the look of. I've even scanned the paper insert to my computer and created my own design. Custom monogram mugs are super hot right now! *If you're using your home computer, try printing on card-stock. Basic printer paper can be too thin and shows thru. Live and learn, lol.


4. Next trace around your insert. I suggest leaving a little extra around one side. This lets the paper overlap in the mug and fully cover.

5. Cut out your paper and wrap it around the inner sleeve. Insert into outer sleeve and screw it all back together. That's it!


Note: You'll want to hand wash this mug and even remove the paper each time you wash. The seal is less than water tight. But, if you get it wet, you know how to replace it! Enjoy :)

Sharing with:

Saturday, January 10, 2015

Tip: Quick Wall Fix with Soap

I had to move some artwork around today and realized there were several pin holes in my living room wall - many of which were overlooked during the last coat of paint. What a bummer! Instead of pulling out spackle or some wall repair (which would need to be painted over) I turned to my handy Olay bar. I know it sounds crazy but the easiest way to fix nail, staple, or pin holes is to grab a white bar of soap. It blends in nicely and takes seconds to do!


Here's the step-by-step: 
  1. Use a piece of newspaper or brown paper bag to smooth out the tiny drywall that might be popping out. There shouldn't be much since we're talking about small holes, but you definitely want to start with a smooth surface. The results are much cleaner. 
  2. Use a white bar of soap and gently rub across the holes you trying to fill-in. 
  3. If there's some residue, you can use your newspaper again to smooth it out or a damp dishcloth - since it is soap you will get a nice smooth surface.
(finished on the right, identical pin hole on the left) 

This works on color painted walls as well. The soap glides on light or almost clear. If you are unsure, you might want to try a test area in a corner or behind a piece of furniture. Also, a damp cloth will wash away any soap on the wall - in case you don't like it, you can undo it! And you don't need to use an Olay bar per se, it's just what I had available. Ivory, Dial, Dove, etc. Any bar soap will do. Enjoy!


Monday, January 05, 2015

Walmart.com $.88 Baking Pans w/ FREE Store Pick Up!

You can pickup three different baking pans for $0.88 each from Walmart.com today. Better still, choose in-store pickup to avoid shipping charges. That makes for an awesome deal!
(Thanks Savings with Shellie!)

If you're all set with baking pans in the kitchen, check out this cute DIY project to keep your little ones busy! There's always a good use for a new pan :)


Friday, December 26, 2014

DIY: Making a Candy Cake


It's my husband's birthday soon and I wanted to do something fun and a little different this year. You know, something his friends and co-workers would get a kick out of since he'll be at work, but without the hassle of a frosted cake. The mess mixed with dress attire, computers, frosting, etc... Not so good. So I landed on the idea of a dummy cake or candy cake. It's full of sweet treats that don't need to be refrigerated, will last several days on his desk, and has something for everyone!

The steps were so easy, and as usual I wanted to see if I could get most of my supplies from the dollar store. Luckily for me, they had everything! The entire project cost less than $12 :)


Here's what you'll need:
  1. Round floral foam, two pieces
  2. A plate, platter or cake board
  3. Disposable tablecloth (or ribbon, wrapping paper, tissue paper, etc.
  4. Assorted candy
  5. Happy birthday necklace (or novelty pin or ribbon would work well too)
  6. Basket wrapping bag (clear cellophane wrapping large enough to hold the cake)
  7. Bow
  8. Scissors
  9. Hot glue gun
  10. Toothpicks


First hot glue the floral foam together. Make sure they're straight and secure.


Next take your tablecloth and cut a strip down one side. You can use this to wrap around your floral foam. This will hide the green foam and give it a festive look.

Use your hot glue gun to attach the tablecloth to the inside of the "doughnut". Be extremely careful. The hot glue will melt through the plastic and can easily burn yourself (I learned this the hard way!!!). 

If you'd rather, you could use ribbon, wrapping paper or tissue paper for this step. You can also use tape instead of glue, however I found hot glue worked best.


Once your cake is fully covered, glue the bottom of the cake to your platter or cake board. It should look something like this above.  **If you find your foam is flaking off, this may be a good time to wipe the cake down with a food safe cleaner.


Now to add the candy. I started with lollipops by evenly distributing them around the top. The sticks on the lollipops easily pop into the foam and stay put without glue or tape. If you find you need help piercing the plastic, try using a toothpick to get you started.  Once you have a full row on top, add another layer to the bottom. I just inserted these between the plate and the cake. 


To add the chocolate I simply pierced the back of the chocolate with a toothpick and then pushed the pick through the foam. Again, you can use glue or tape for this step depending on your candy and materials.


Now for the "happy birthday"! I found a cute novelty necklace and simply draped it over the lollipops. I tucked the chain into the center "doughnut hole" and topped off the center with the remaining candy.


To finish, I wrapped the whole candy cake in a clear cellophane bag and tied it with a bow. You can often find these "basket" bags with other wrapping supplies (think fruit basket, lol). It was a perfect size. And all of this for around $12 :)


Wednesday, December 17, 2014

DIY: Making Laundry Detergent

I started making laundry detergent about six months ago. It was more necessity than frugality. We have some serious allergies in our family and I tried everything that the store had to offer that might be friendlier to my skin (and sniffles!). Frankly I've heard about homemade soaps for years, mainly from my sister who thought I was a walking contradiction buying frugal everywhere but the laundry aisle, but I thought the process was a nuisance. It was so much work boiling, bottling, etc. I didn't have the time for all that. As the saying goes "time is money" - the trade-off didn't make sense to me.

But eventually I came around, specifically when I found some time saving tips and altered the recipe to fit my family's needs. To make this "hypo-allergenic" detergent, you'll need:


  • 1 c. Borax
  • 1 c. Baking Soda (my sister swears by Washing Soda, but this works great too)
  • 1 bar Zote
  • Canister, scoop and cheese grater
  • Optional: Table Salt, Rice, Sock
  1. First grate your Zote bar into the canister/container. Make sure it has a good seal. You don't need this to be fine, just small enough to dissolve easier in the water during washing. I have a separate cheese grater I use just for soap and non food grating, however the Zote website says it is safe to wash your dishes with (it's multipurpose!) so if you don't have a spare just be sure to wash it well before using next time. OR Use Zote Flakes. This is a new product that I recently spotted at Walmart, no grating needed! Each box equals two bars, but you'll pay about twice the price ($2.68).
  2. Now add 1 cup borax and 1 cup baking soda. 
  3. Mix well. I like to do this with my hands because it allows me to break up any large Zote pieces. 
  4. Add a desiccant. What's a desiccant? You know, those white packets you see in your snack foods or pill bottles that keep the product fresh and "crisp"? That's a desiccant. To make one, simply add rice to a clean sock or dish towel and tie it shut. The rice will draw out extra moisture from the detergent preventing clumping (which can be such a hassle down the road!).
Optional: Add a tablespoon of salt to each load to preserve it's vibrant color. Salt helps set the dye and borax can be a bit harsh. I found without salt, my deepest darks faded a bit those first few washes. Salt stopped this from happening altogether.


This recipe fills half a coffee canister, but the best part is how much I go through. It takes about two tablespoons per load! That makes just one batch last months! Ok, now for the cost break down:

Borax: $1.38 with coupon at WinCo
Baking Soda: $0.59 at 99 Only or $0.52/lb at WinCo in bulk
Zote: $0.59 per bar at 99 Only or $2.68 per box at Walmart
Salt: $0.24 at 99 Only
Total for supplies = $3.15 per batch or $0.02 per load!

Tuesday, December 09, 2014

Christmas Decorating DIY Advent Calendar

I'm decorating for the season, as I'm sure many of you have already started doing as well and I had to share this character the hubby and I put together for the Advent calendar....


That's right, I couldn't stand another year with cheap tasting, chalk coated, chocolate squares that were messy and get all over the carpet the moment you open them. Besides, Advent isn't about chocolate (altho, who turns down chocolate?? Anyone?)  But many store bought calendars don't come with scriptures anymore, and to me it defeats the purpose of it all. So this year we made our own and turns out it was a lot of fun putting it together.

First I grabbed a sleigh. I found this cute poka-dot gem at the 99 Only back in July. I can't say enough about buying in the off season. In fact, I plan some of my trips around it! Next we bought cupcake cups. These come in a set of 24 - perfect for this project! After doing some research, the hubster gave me his list of scriptures which I wrote on the bottom of each cup and added the day. Then we filled it with candy, stuffed the top with leftover tissue paper (you know, the stuff that gets crinkled in the back of your wrapping box - not pretty enough for gifts, but perfect for this).


Then I put it all together; the moose was a gift from the hubby on our first Christmas, I also added some tulle I had left over to imitate snow. All in all we spent no more than $5. Plus it is the cutest centerpiece on our table. We're putting a little whimsy in our holiday this year!